Old Hollywood waves have a recognizable shape: glossy, flowing ridges that move together instead of separating into individual curls. A deep side part and one sculpted front wave can make a simple outfit feel ready for a holiday party, but the style also works on bobs, medium-length hair and softer everyday finishes. The key is setting the curls in a consistent direction, letting them cool, then brushing them into a shared wave pattern. That last step is the one that turns separate curls into a single flowing wave, and it works best on hair that has been set while the curls are still warm. If you are new to the style, start with a side part and large sections, because small sections set a tighter curl that is harder to brush out into a smooth wave.
These 35 Old Hollywood wave ideas cover side parts, short hair, long lengths, softer modern variations and New Year’s Eve accessories. You will also find practical notes on how to shape the waves without turning them into tight ringlets. For more seasonal inspiration, browse our holiday party hairstyles or Christmas hairstyles for women.
What makes a Hollywood wave different from an ordinary curl?
Hollywood waves usually flow in aligned S-shaped ridges, especially around the face. The hair can be polished or softly brushed out, but the sections move together. Traditional finger waves are sculpted with fingers and a comb, often close to the head, while curling-tool waves are formed from set curls.
- For a classic red-carpet look: deep side part, consistent curl direction and a smooth front ridge.
- For short hair: a sculpted bob with one defined face-framing wave.
- For softer modern glam: larger waves, gentle root volume and a less rigid finish.
- For New Year’s Eve: one crystal clip or pearl pin placed away from the main wave pattern.
Classic Side-Part Old Hollywood Waves
A side part makes the front wave the focal point. These versions vary the depth of the part and the amount of structure through the ends.
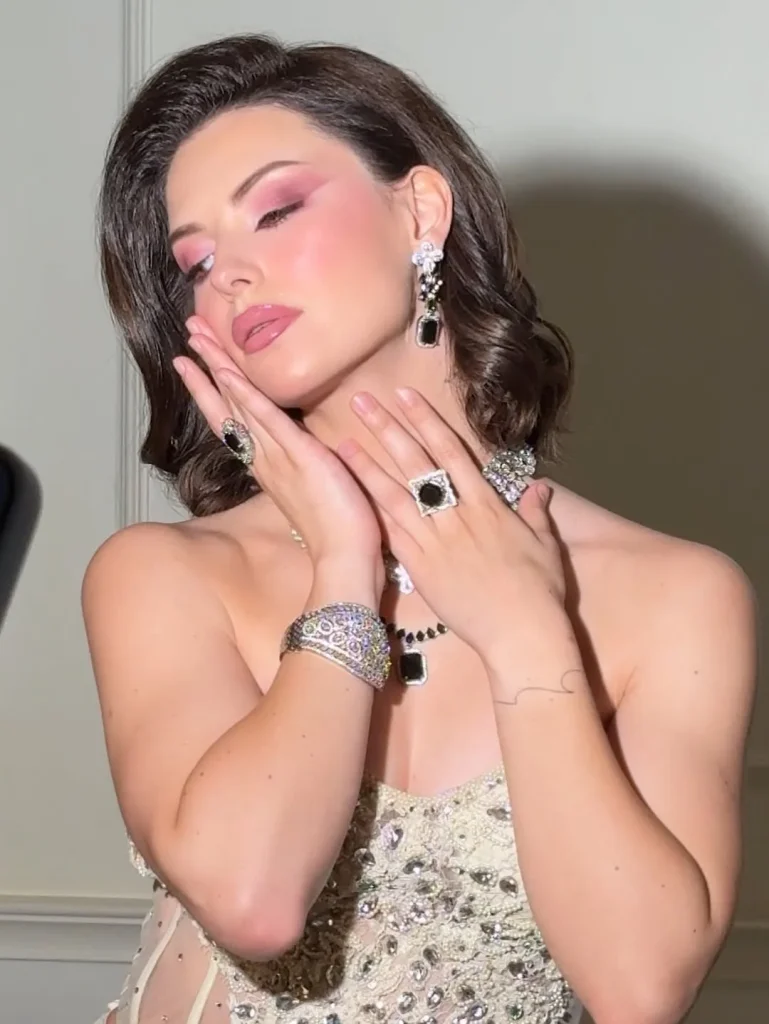
1. Deep Side-Part Glossy Waves
View Instagram post by @pawankumar_hairstylist
Create a deep part above one eyebrow and curl sections in a consistent direction before pinning them to cool. Brush through gently until the curls form connected ridges. Smooth the surface with a small amount of finishing product, keeping the roots from looking greasy.
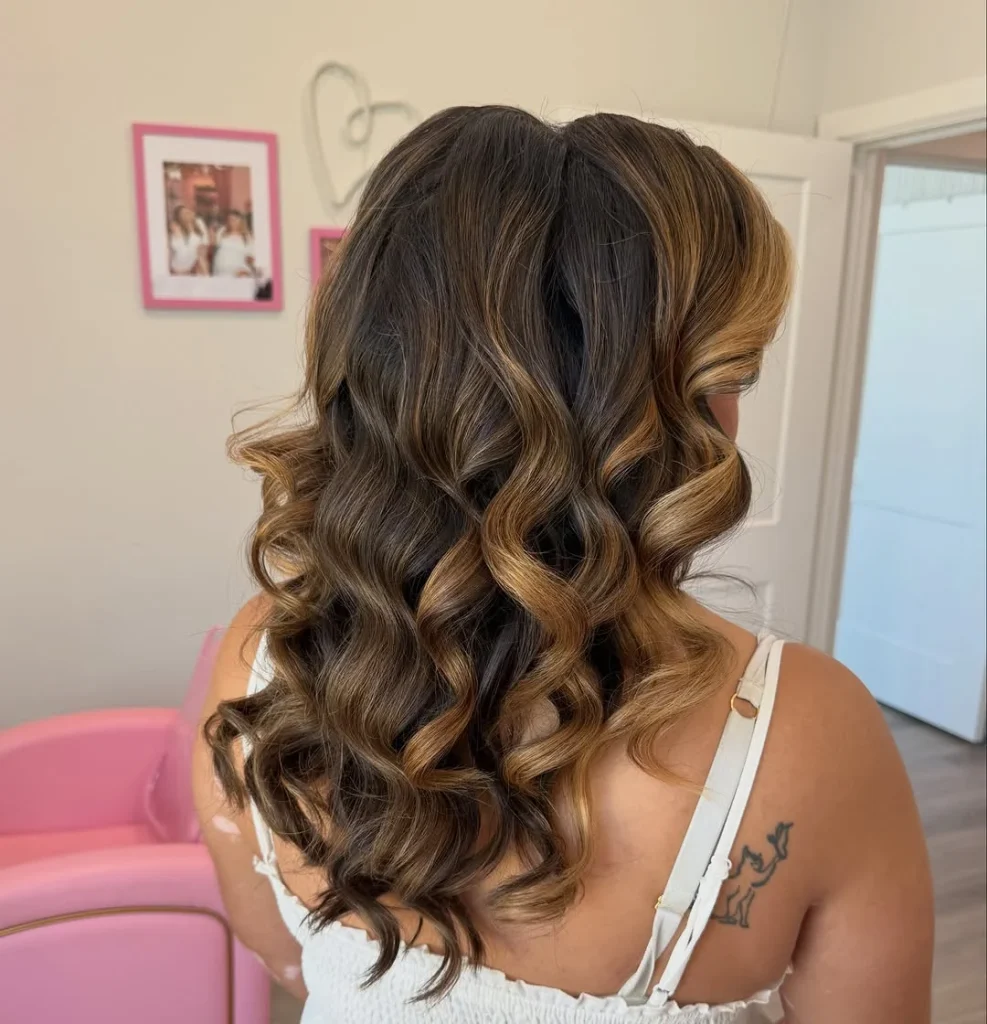
2. One-Side-Tucked Hollywood Waves
View Instagram post by @amandadidmyhair
Shape the waves with a deep side part, then tuck the lighter side behind the ear and secure it with hidden pins. Let the fuller side sweep forward over the shoulder. This asymmetry looks especially polished with statement earrings.
3. Classic Red-Lip Vintage Waves

View Instagram post by @atelie_erynsantos
Keep the hair glossy and the front wave sharply defined, with the ends curving inward rather than flipping out. A red lip can complete the vintage mood without extra hair accessories. The look works well on medium to long lengths.
4. Soft Side-Part Brushed Waves
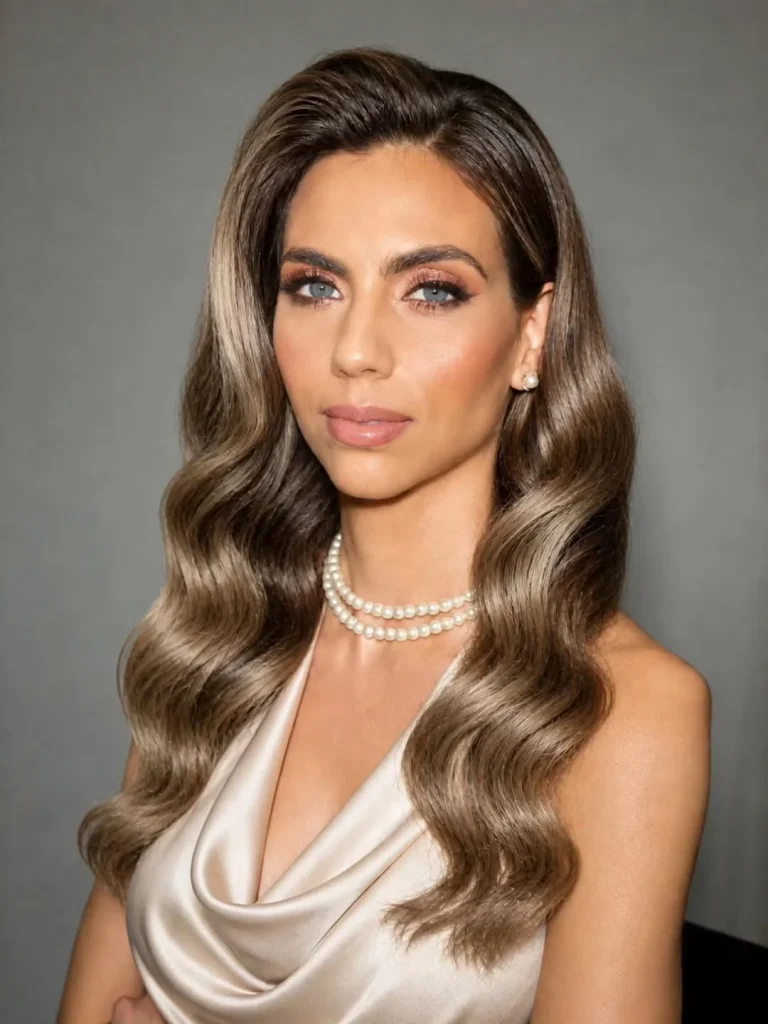
View Instagram post by @stellatsiledaki
Use a wide curling barrel to form loose curls, let them cool, then brush until the pattern becomes soft and connected. Leave a little natural movement around the crown. This is a more wearable version of the classic silhouette.
5. Sculpted Front S-Wave
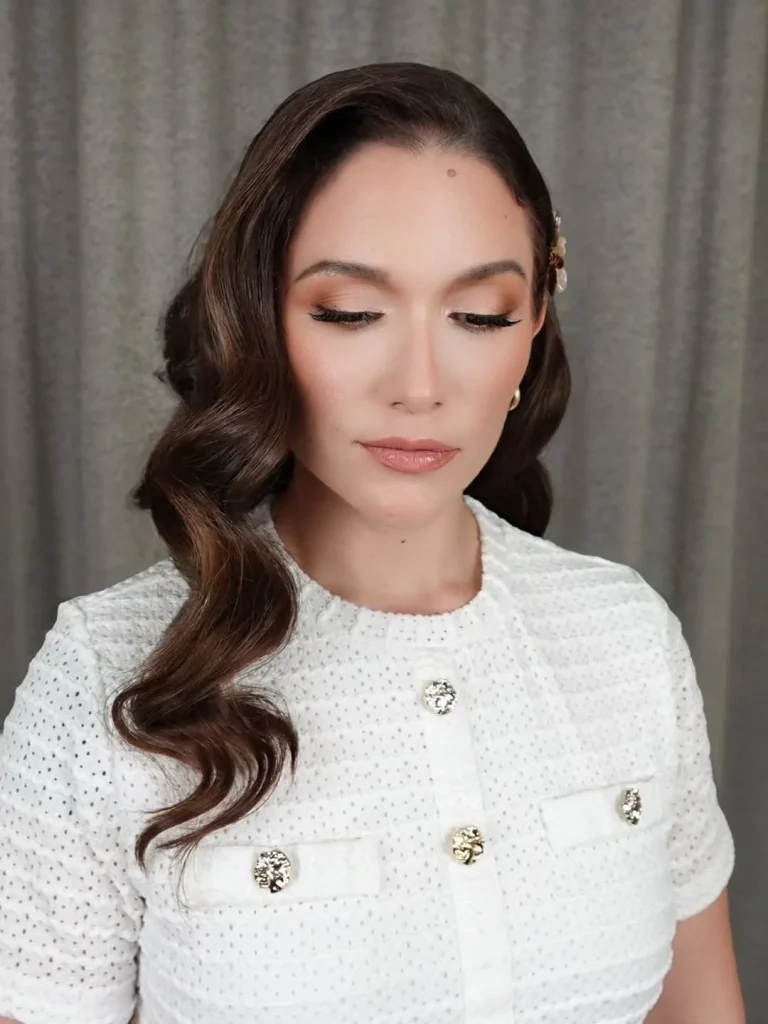
View Instagram post by @kristysartistrydesignteam
Concentrate the most defined S-shaped ridge at the front hairline and keep the rest of the lengths in smooth, softer waves. A long clip can support the front ridge while it cools; place it carefully to avoid creases and remove it once the shape has set.
6. Side-Part Waves with a Low Hairline Sweep
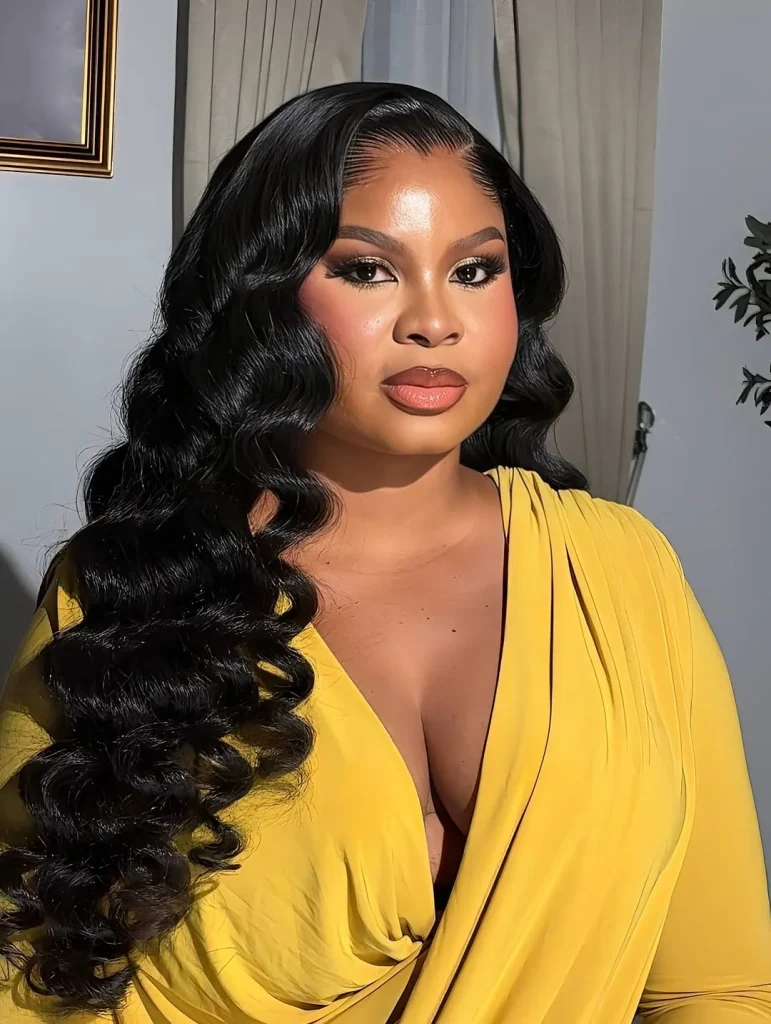
View Instagram post by @lajuhair_empire
Sweep the front section close to the forehead before curving it back toward the ear. The lower wave creates a dramatic frame for the face. Keep the remaining hair controlled so the front shape remains the focus.
7. Polished Side-Part with Hidden Pins
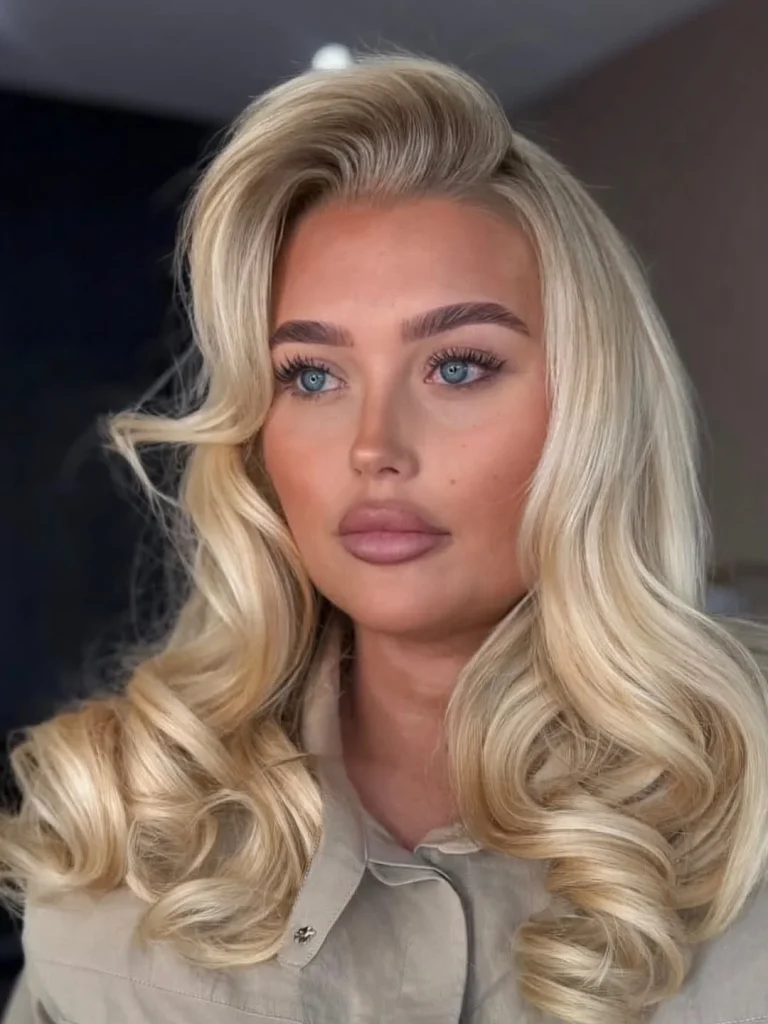
View Instagram post by @bondandblendstudio
Brush the curls into broad ridges, then secure the lighter side with crossed pins underneath the top layer. The pins should disappear into the hair. This gives the illusion of a perfectly tucked style without relying on heavy hairspray.
Hollywood Waves for Short Hair and Bobs
Short hair can carry a strong vintage wave without extra length. The trick is placing the bend where it frames the cheekbone or jaw rather than trying to create a long cascade.
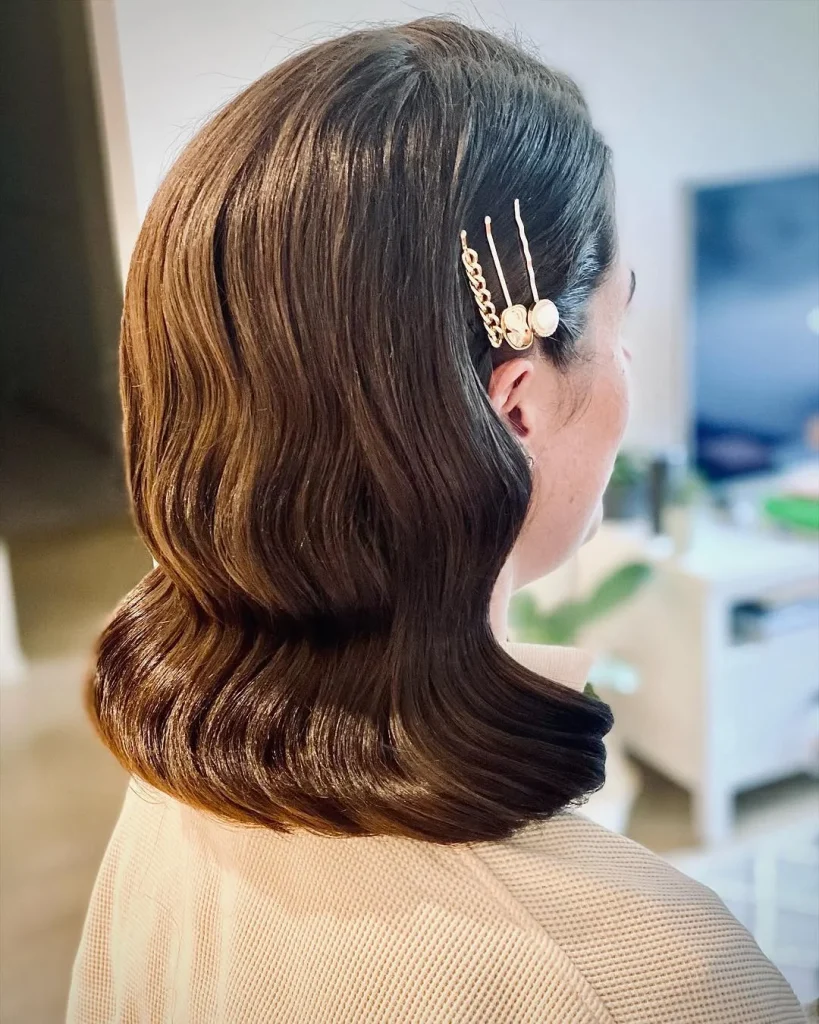
8. Sculpted Bob with Hollywood Waves
View Instagram post by @styledbyteresap
Set a bob into smooth S-waves and turn the ends inward. Keep the top flat enough that the wave shape stays visible. Seen from the back, the sculpted ridges give the bob a polished, vintage finish.
9. Short Hollywood Waves with a Lifted Fringe
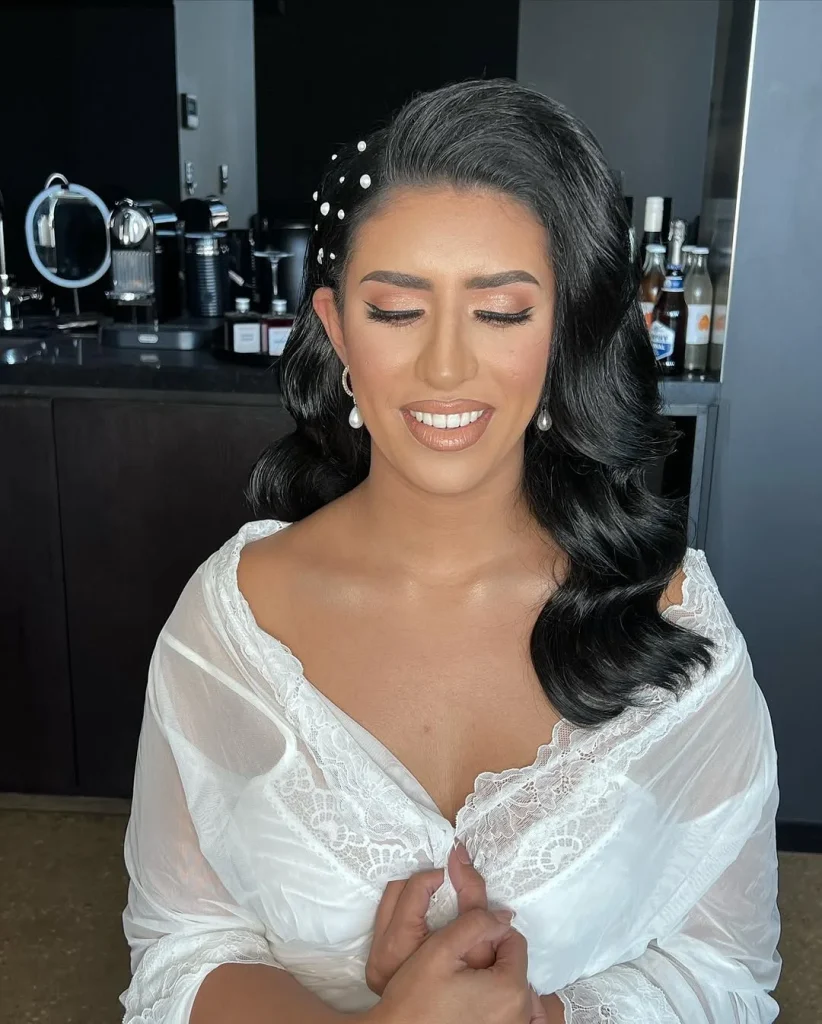
View Instagram post by @sajiyahairstylist
Lift the fringe section up and over into a broad, glossy wave on short hair, then connect it to smooth waves through the lengths. A few pearl pins at the hairline add a delicate vintage finish.
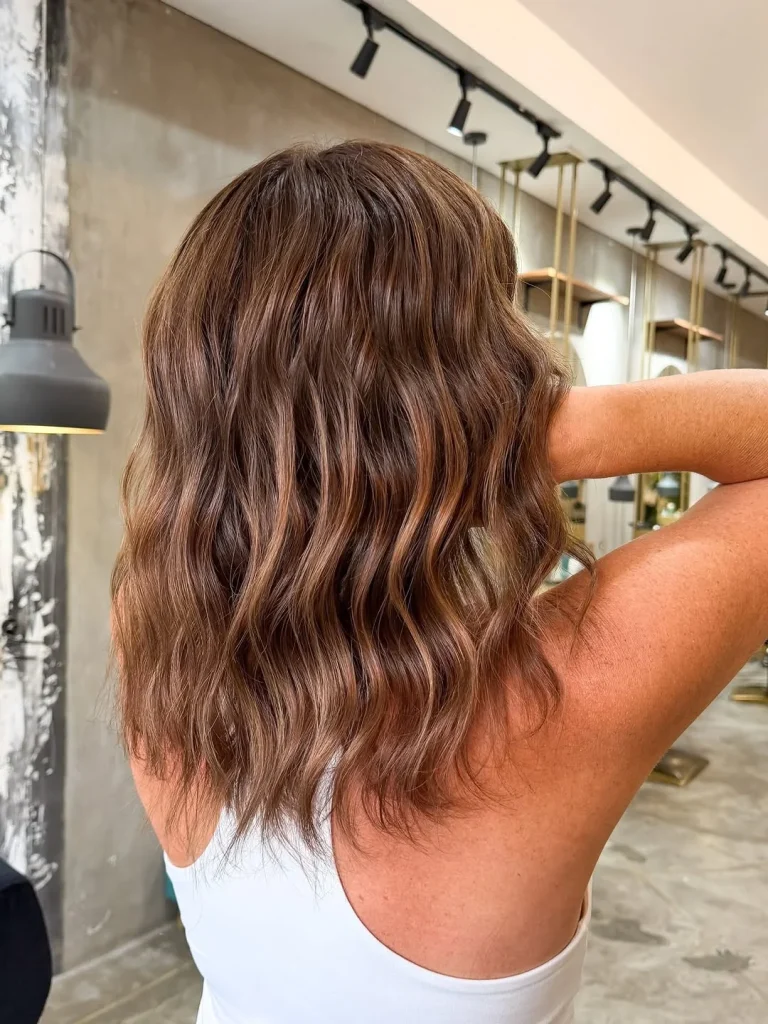
10. Soft Vintage Waves on a Lob
View Instagram post by @latelier_bali
Use a larger curling tool to create loose, connected bends on a shoulder-grazing lob. Brush the curls gently and keep the ends soft rather than sharply curled. The result feels vintage without looking overly set.
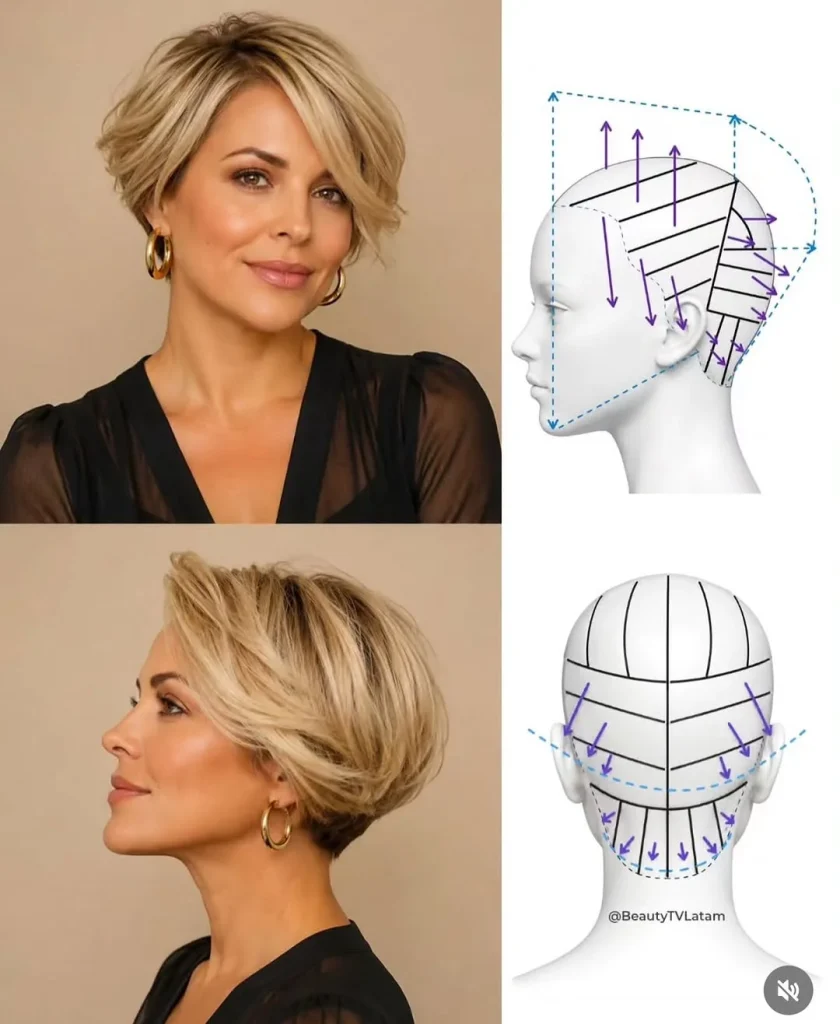
11. Side-Swept Wavy Pixie
View Instagram post by @llemmaleighall
On a longer pixie, use a small comb and styling product to sculpt a wave through the front fringe. Keep the sides smooth and the back natural. You only need one clear ridge for the style to reference Old Hollywood.
12. Short Finger-Wave Detail

View Instagram post by @kerrykay_styles
Work a finger-wave pattern through the front of short, damp hair with a comb and suitable setting product. Allow it to dry according to the product instructions before disturbing the shape. This is a more sculpted technique than brushed curling-iron waves.
13. Jaw-Length Bob with Rolled Ends

View Instagram post by @che.saw.beauty
Form a broad wave through the front and roll the ends under toward the jawline. Keep the side opposite the part sleek. This balanced shape suits a simple neckline and doesn’t require decorative pins.
14. Curly Bob with Vintage Side Part
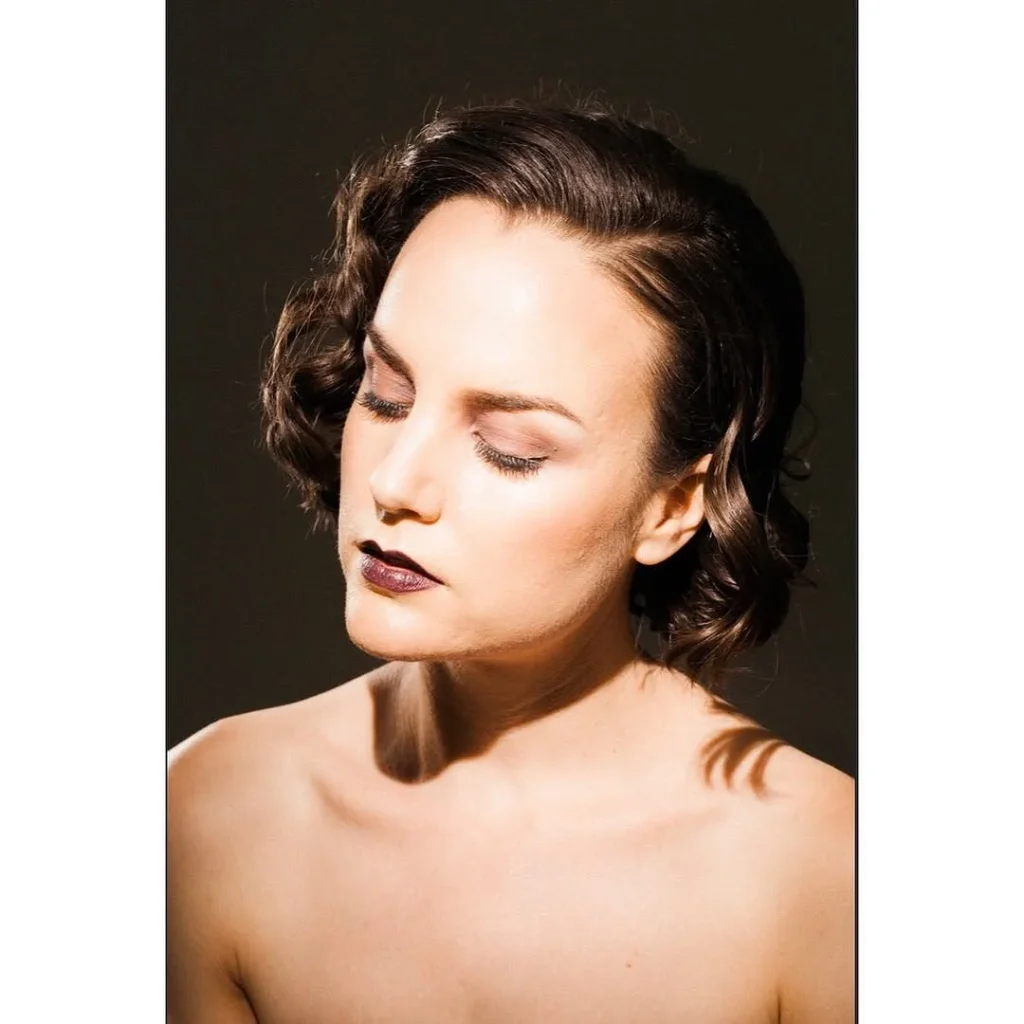
View Instagram post by @gypsealocks.hairdesign
Define your existing curls, then shape the front section into a gentle side-swept ridge using clips while it dries. Leave the back curls with their natural movement. This adapts the vintage mood without forcing every curl into the same pattern.
Long and Medium-Length Glam Waves
Longer lengths show off the full wave pattern. Work in consistent sections, and avoid breaking the ridges apart when you finish styling.
15. Waist-Length Glossy Hollywood Waves

View Instagram post by @prettygirlglamm
Create repeated waves through long hair, brushing the curls into one continuous cascade. Keep the roots smooth and concentrate shine through the mid-lengths. A strong but flexible finish helps the wave pattern move rather than feeling stiff.
16. Medium-Length Champagne Waves
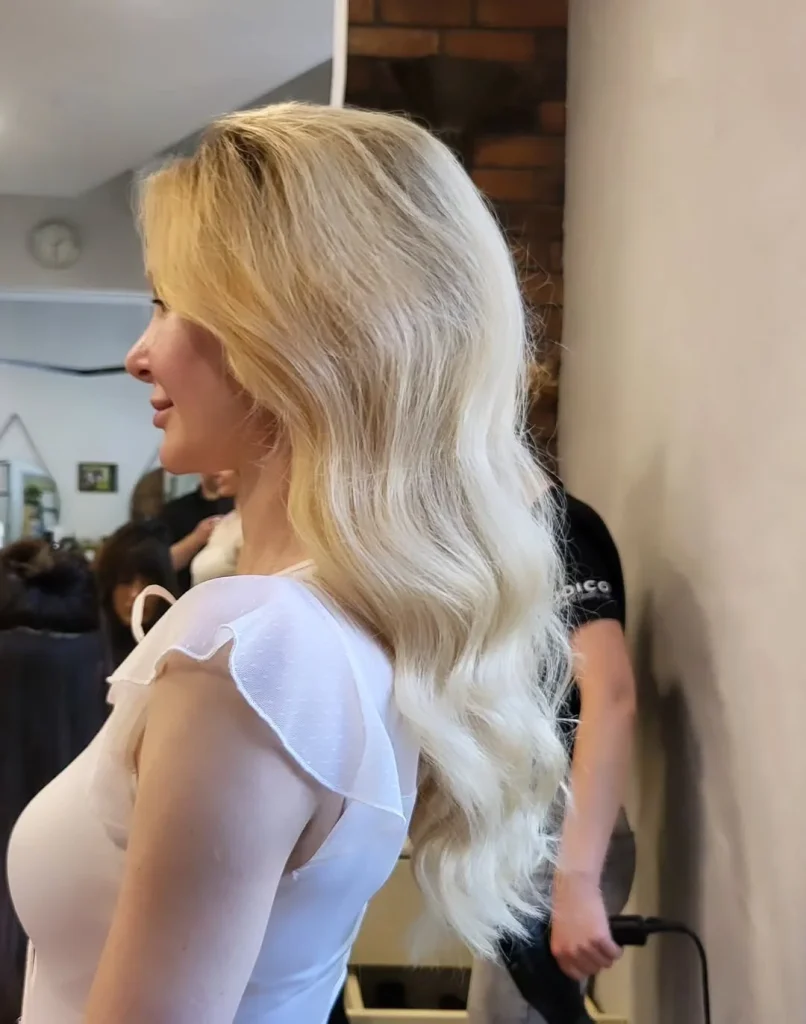
View Instagram post by @hryshkohair
Use a soft side part and broad waves on collarbone-length hair. Let the ends curve slightly inward for a classic finish. This length is easier to keep off the shoulders than very long curls during a busy event.
17. Center-Part Soft Hollywood Waves
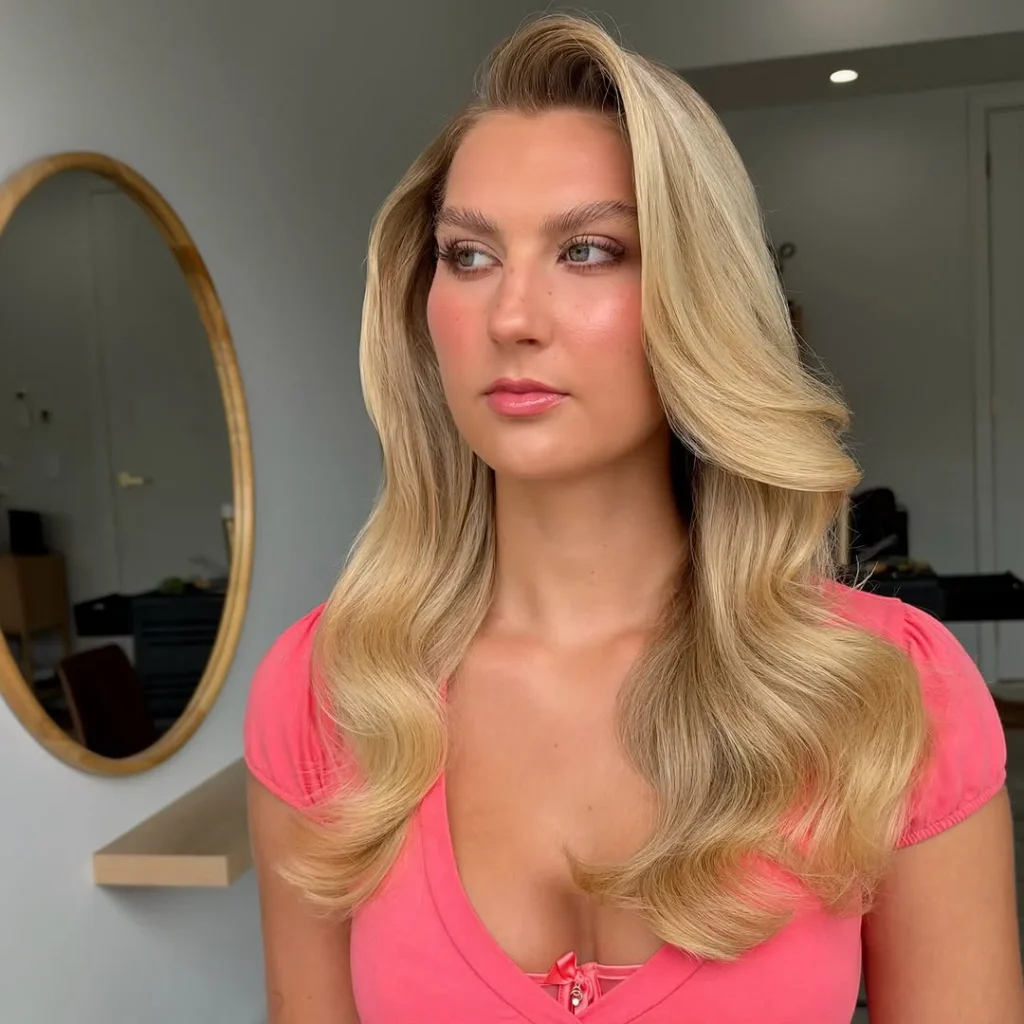
View Instagram post by @pamelanehmemakeup
A center part gives the style a more modern, balanced feel. Shape matching waves on both sides and avoid a sharply sculpted forehead curl. This works well when you prefer symmetry over the classic dramatic side sweep.
18. Long Brunette Waves with Face-Framing Ridge
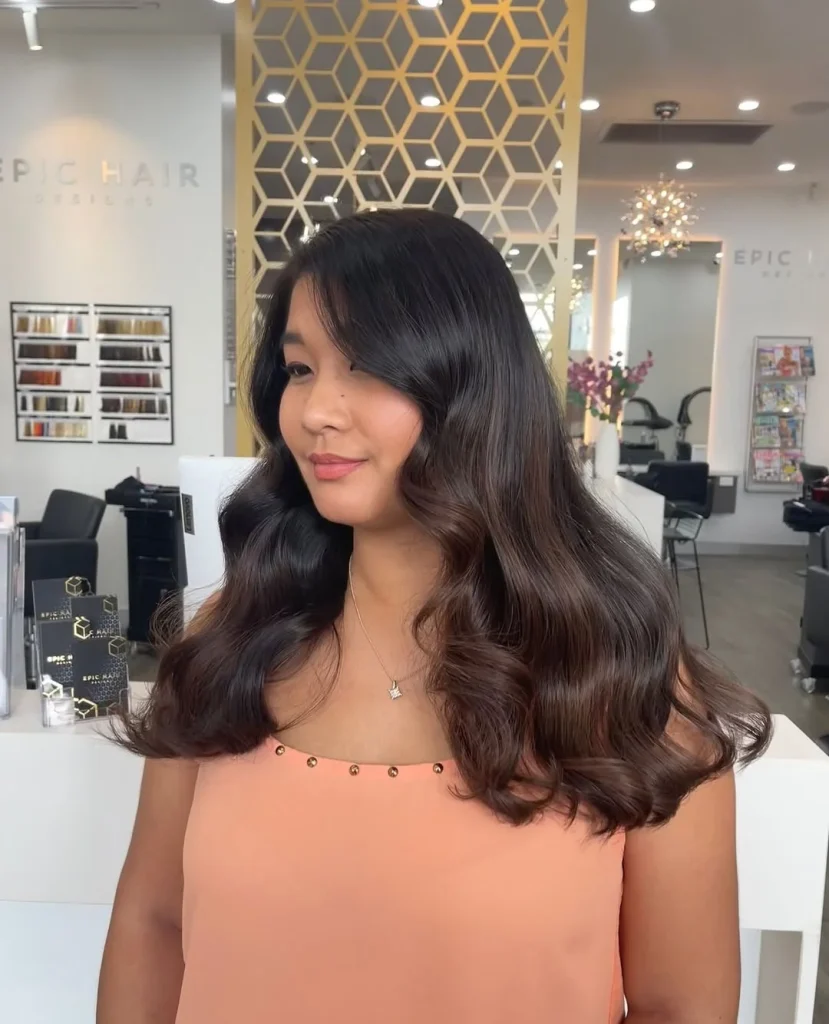
View Instagram post by @epichairdesigns
Set the front sections into a defined ridge near the cheekbone, then brush the lower lengths into broad waves. Glossy brunette hair shows the alternating highlights and shadows of the pattern clearly. Keep the front wave separate while setting.
19. Blonde Hollywood Waves with Soft Volume

View Instagram post by @janty_hairdresser
Add gentle lift at the roots before setting the lengths into large curls. Brush the finished waves lightly so the hair stays airy. Too much product can make pale blonde hair look heavy, so use a restrained amount.
20. Long Black Hair with a Sleek Side Sweep

View Instagram post by @rosevisualmua
Smooth the roots and shape large waves through the lower half of long black hair. A deep side sweep gives the style a strong silhouette. Use a little shine product only on the surface to avoid flattening the wave ridges.
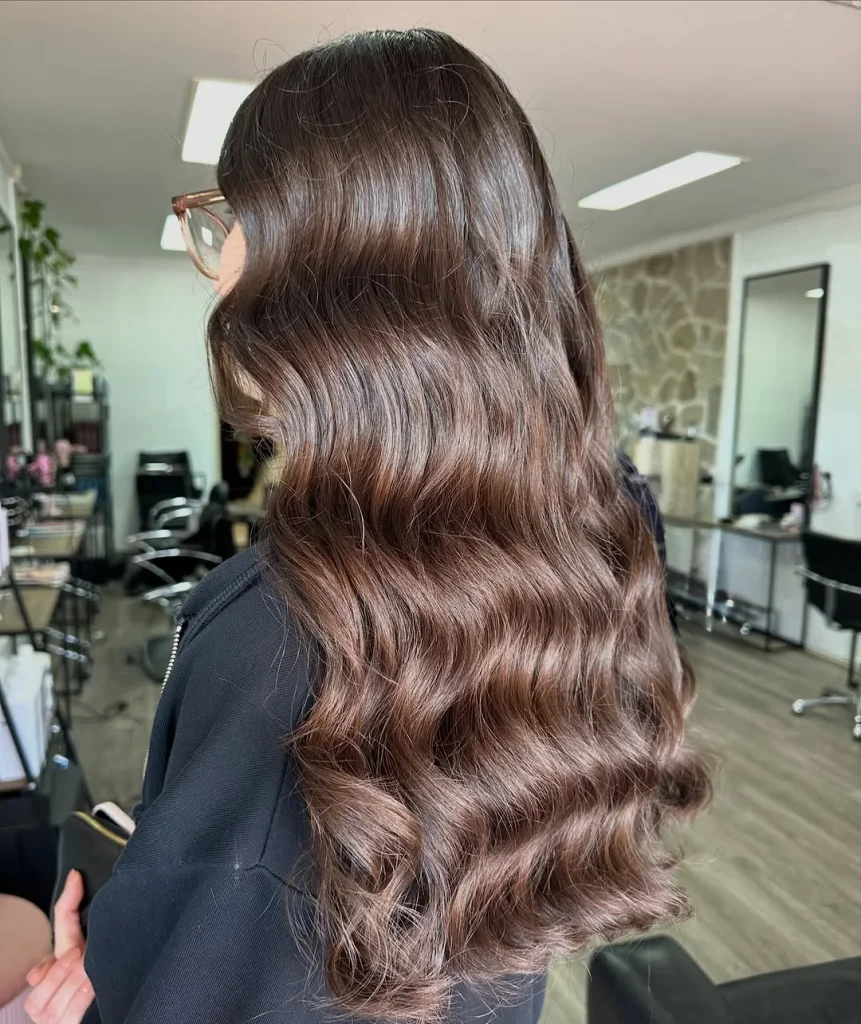
21. Chestnut Waves with Turned-In Ends
View Instagram post by @claraemilyhair
Shape broad waves from around ear level and roll the ends inward. The result has a classic finish without needing curls close to the roots. It works especially well with shoulder-length or longer layered hair.
Modern Hollywood Waves and Half-Up Variations
Modern interpretations keep the glossy wave pattern but relax the styling around the crown. A clip or half-up fastening can also help the look survive a long evening.
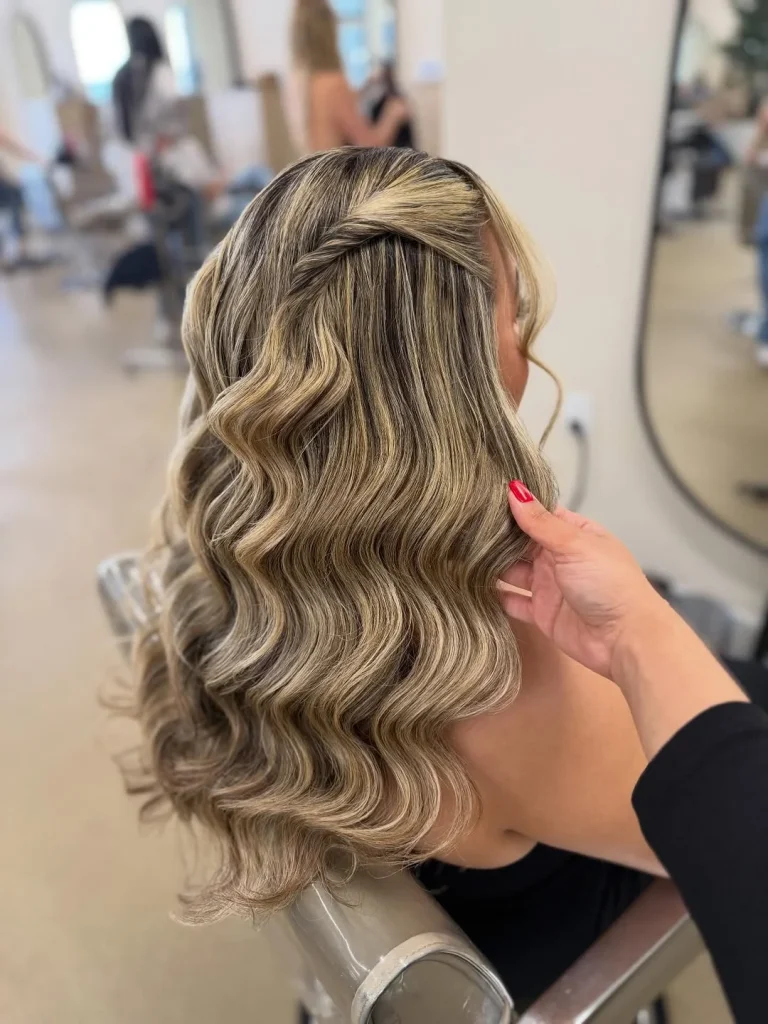
22. Half-Up Hollywood Waves
View Instagram post by @mariam_alimyan
Gather a small crown section into a low half-up twist, leaving the rest of the hair in brushed waves. Secure the twist before refining the loose lengths. This is a comfortable option if hair falling into your face bothers you.
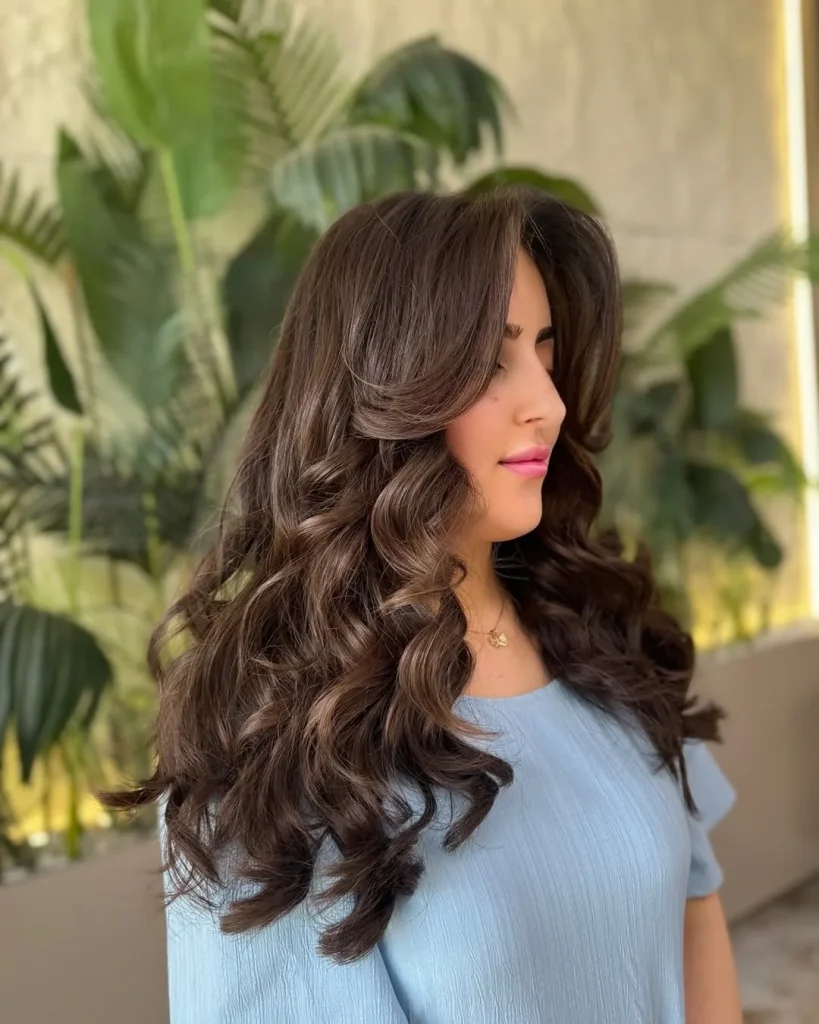
23. Loose Hollywood Waves with Curtain Bangs
View Instagram post by @salon_hangaw
Let curtain bangs fall naturally around the face while shaping the longer lengths into broad connected waves. Bend the bangs away from the cheeks rather than forcing them into the main wave pattern. The result feels soft and current.
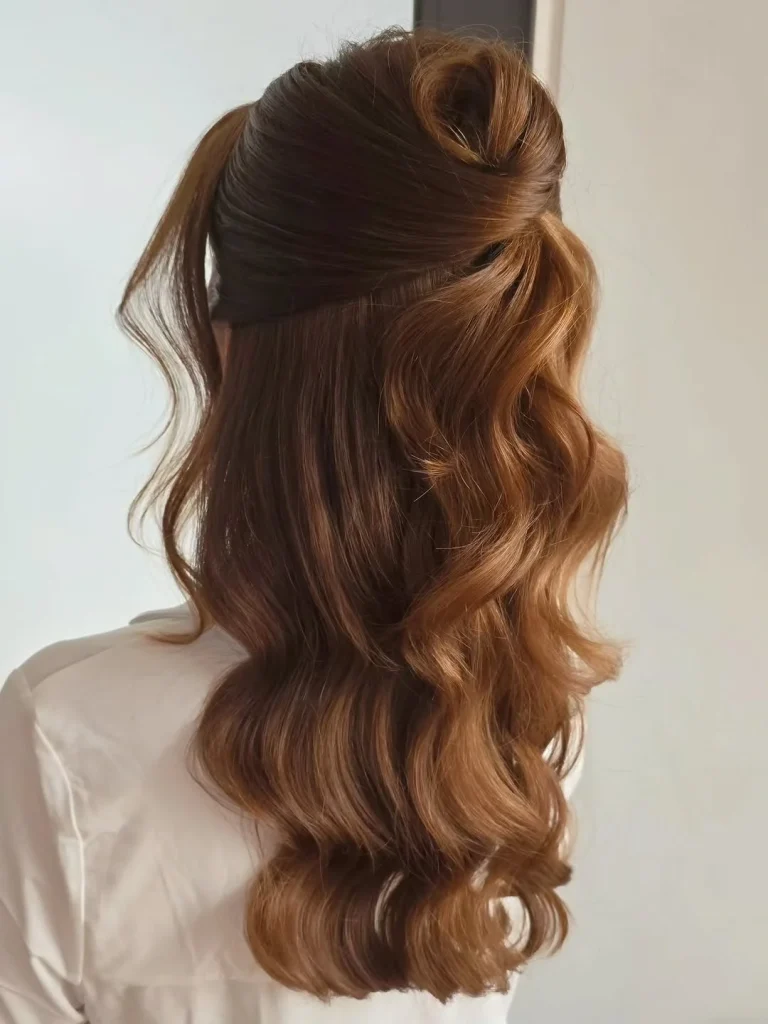
24. Twisted Half-Up Waves
View Instagram post by @sarahwhair
Twist the top sections back into a soft half-up fastening, leaving the tail of the twist to add layers and movement over the flowing waves. Keep the waves loose and glossy so the twist stays the focus at the back.
25. Hollywood Waves with a Crystal Hair Vine
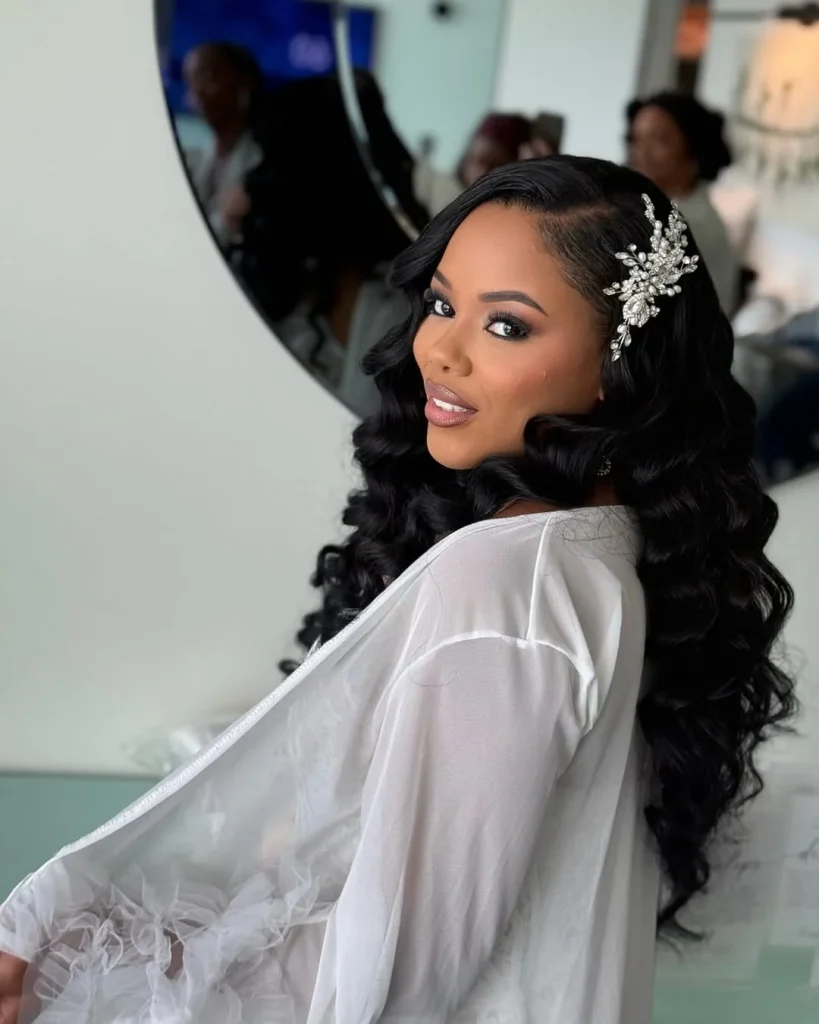
View Instagram post by @hairmakeupvanessa
Place a crystal hair vine along the smooth section above the ear. Keep the vine on the smooth section rather than across a raised wave ridge. This adds sparkle without flattening the front pattern.
26. Relaxed Hollywood Waves on Layers
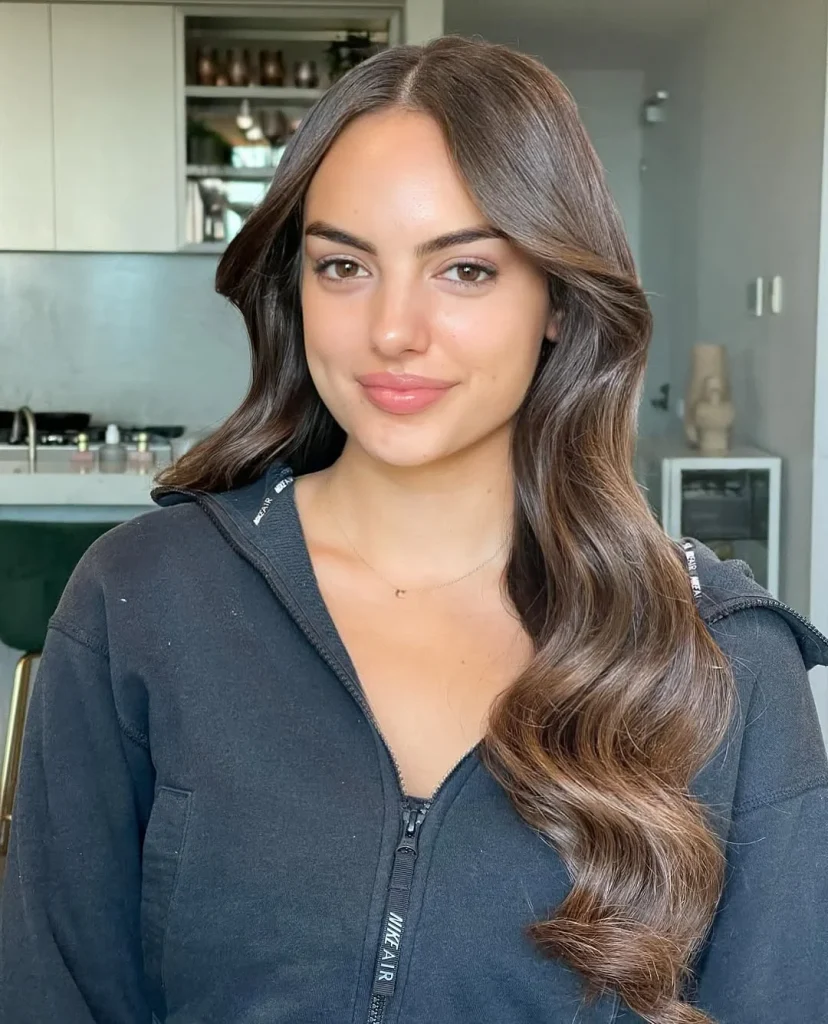
View Instagram post by @ellasbridalhair
Curl the longer layers in the same direction, then brush them into broad bends. Let shorter layers frame the face rather than trying to force every piece into one rigid ridge. This is a forgiving version for layered haircuts.
27. Vintage Waves with Natural Root Texture

View Instagram post by @sprykina_v
Keep the roots close to their natural texture and define the wave pattern through the mid-lengths and ends. This contrast creates a softer modern finish. Use a styling approach appropriate for your texture instead of repeatedly heat-straightening the roots.
28. Hollywood Waves with a Low Side Ponytail
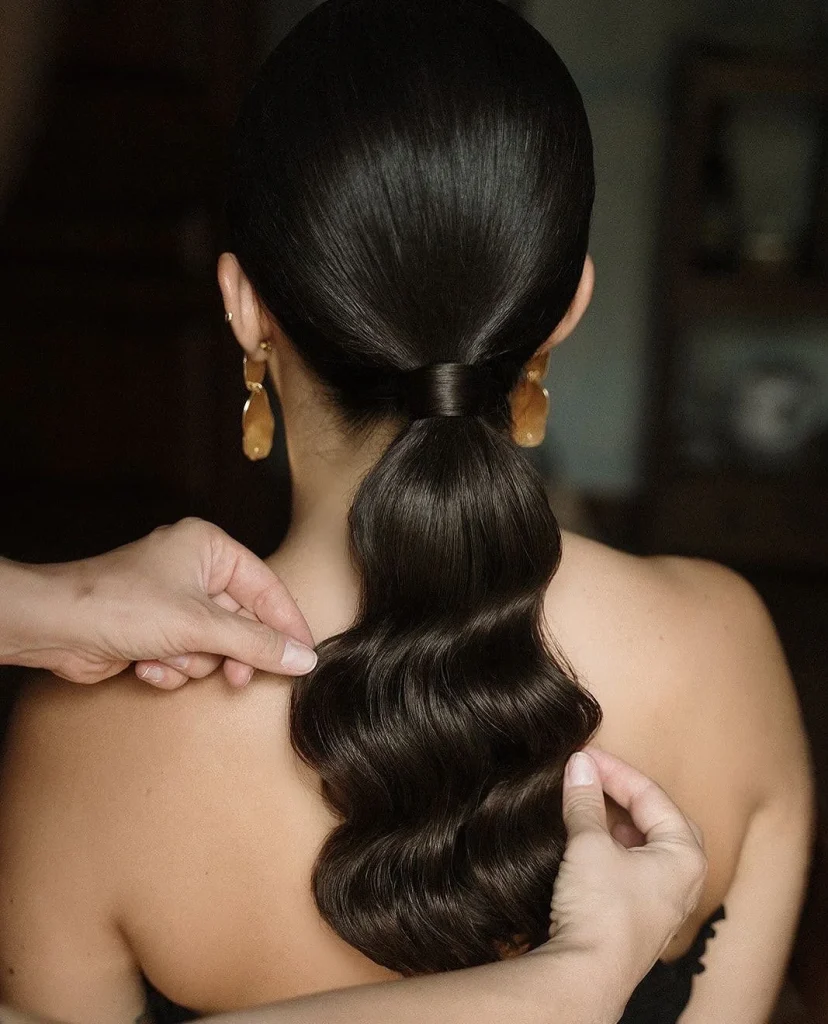
View Instagram post by @aymakemeup
Shape the lengths into waves first, then gather them into a low side ponytail using a covered elastic. Smooth the top gently and let the waves fall over one shoulder. Keep the ponytail loose enough that the pattern isn’t crushed.
Old Hollywood Waves for New Year’s Eve and Formal Events
For an evening event, one well-placed accessory can be more effective than several. Keep the wave pattern clear and consider the neckline of your outfit.
29. New Year’s Eve Side-Part Waves
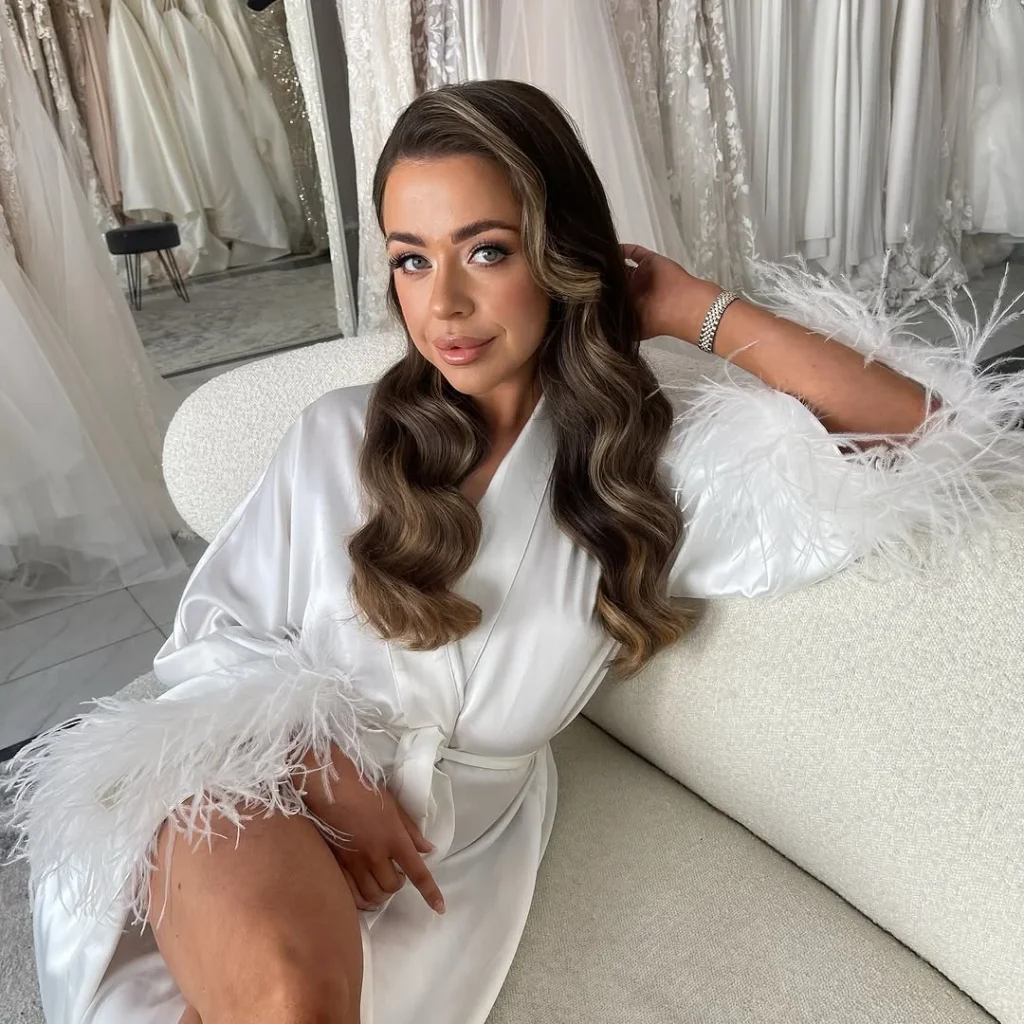
View Instagram post by @leggybirdhair
Create glossy side-part waves with a deep part and a smooth front ridge. The glossy finish picks up the light at evening events without covering the wave pattern. Choose a style that holds its shape as you move.
30. Soft Waves with a Gold Hair Accessory

View Instagram post by @hairbyfouzia
Shape soft waves through long dark hair and finish the back with a gold hair accessory. Keep the waves smooth and flowing so the gold detail stands out against the dark lengths.
31. Pearl-Pinned Hollywood Waves

View Instagram post by @idohairbykmay
Place two or three small pearl pins along the smooth side behind the ear, leaving the main waves untouched. Space them naturally rather than lining up a large cluster. This is a subtle option for Christmas dinner or a winter wedding.
32. Hollywood Waves with a Sleek Black Dress

View Instagram post by @hairbyadelina__
Keep the hair glossy, the part deep and the accessories minimal so the waves frame the face. A clean shoulder line gives the hair room to fall. The styling relies on the shape of the waves rather than extra decoration.
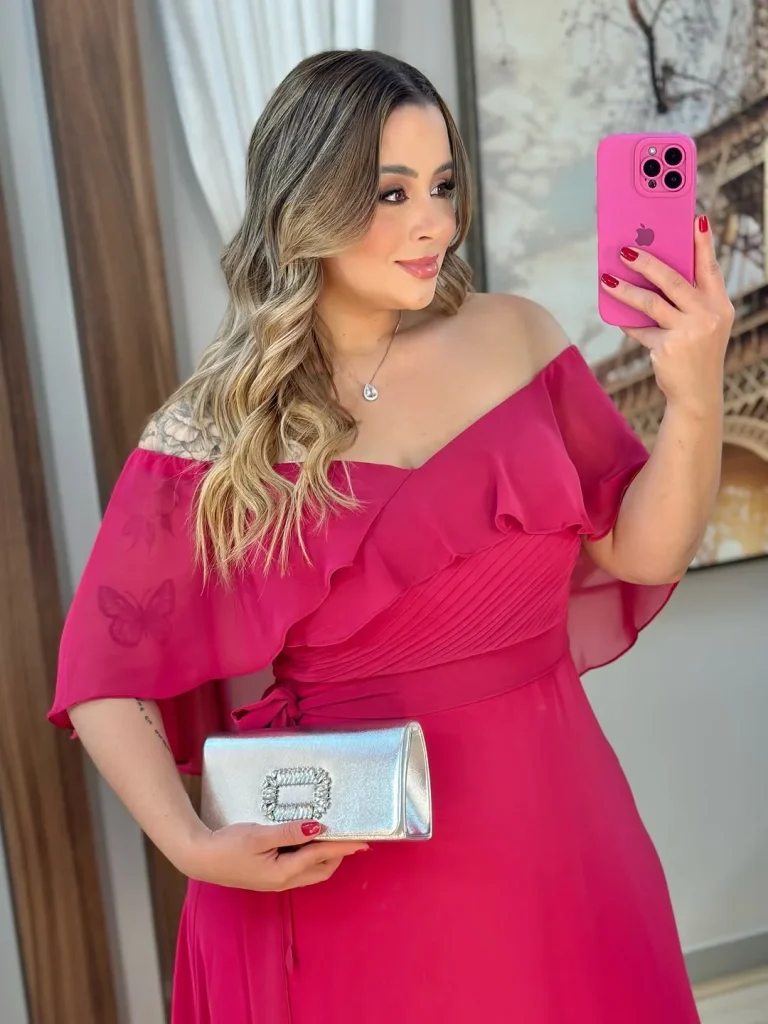
33. Soft Waves over One Shoulder for an Off-Shoulder Dress
View Instagram post by @curvygirlsvip
Wear the waves swept over one shoulder so they fall beside the neckline of an off-shoulder dress. Keep the lighter side tucked behind the ear and let the soft waves frame the open neckline.
34. Soft Bridal-Inspired Hollywood Waves

View Instagram post by @amandawhitemakeup
Use wide, brushed-out waves with a smooth crown and a delicate side pin. The finish is formal but not overly rigid. For related looks, our half-up wedding hair guide has other romantic options.
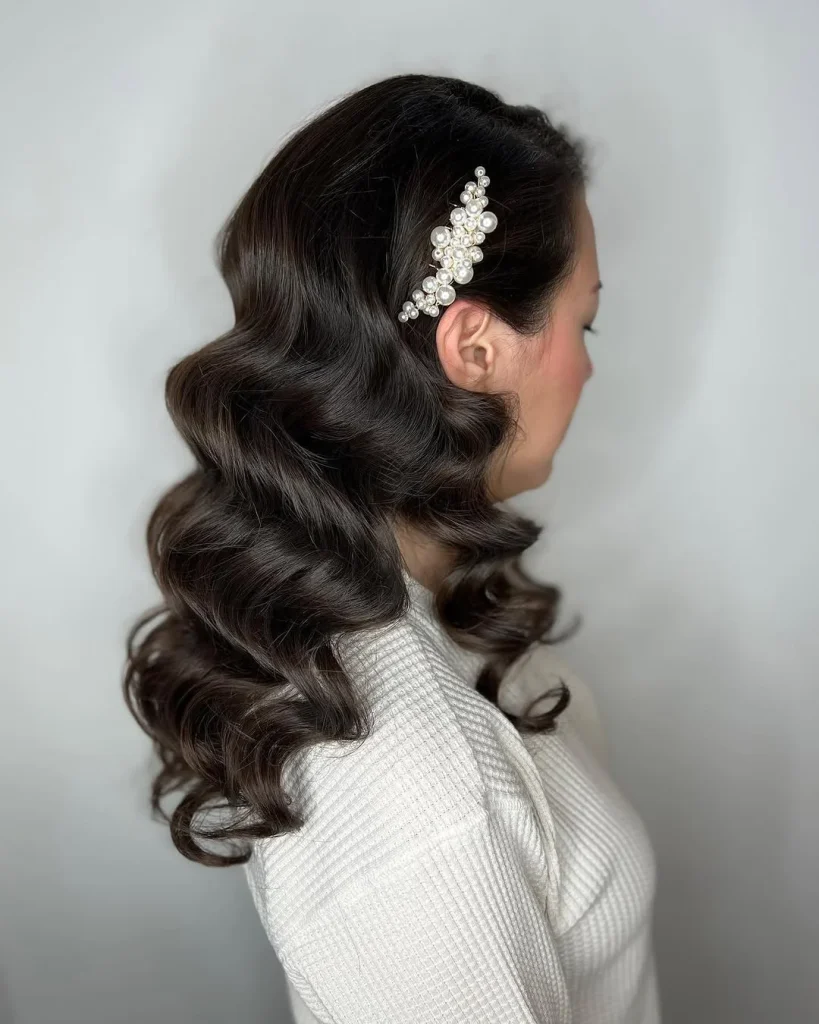
35. Hollywood Waves with a Sparkling Hair Comb
View Instagram post by @stellachiohair
Set the waves, tuck one side and slide a small sparkling comb into the smooth section just above the ear. Check that its teeth grip securely without pulling. Keep the comb away from the raised ridges so the wave pattern stays intact.
How to create Old Hollywood waves at home
Begin with dry, detangled hair and a heat protectant suitable for your tool and hair type. Make a deep side part if you want the classic look. Curl medium-sized sections in the same direction, then clip or pin each curl while it cools. Consistent section size and direction help the waves join together later.
Once the hair is cool, remove the clips and brush gently with a suitable brush until the separate curls begin to form connected S-shaped waves. Use your fingers and long styling clips to encourage the front ridge into place. Let the shape settle, then finish with a flexible-hold spray. If the pattern starts to separate, smooth the surface rather than adding more heat immediately.
For a softer look, use larger sections and brush less. For a sharper vintage finish, set smaller, consistent sections and give them more time to cool. A stylist can help with finger-wave techniques on short hair or textures that need a different setting approach. Avoid heat tools on damp hair unless the tool is specifically designed for that use.
If you prefer a gentler styling routine, explore our heatless curl methods for ways to build movement before brushing it into softer waves. Heatless sets won’t always create the same sculpted ridges as a traditional hot-tool set, but they can provide a useful starting shape.
Frequently Asked Questions
What is the difference between Hollywood waves and beach waves?
Hollywood waves are smooth, aligned ridges that flow together. Beach waves are usually looser, more separated and intentionally irregular. The brushing and setting technique creates much of the difference.
Can you do Hollywood waves on short hair?
Yes. A bob or longer pixie can carry one or two defined S-waves around the face. On very short hair, finger-wave styling may be more practical than trying to brush out large curling-tool curls.
How do I keep Hollywood waves from falling flat?
Let each curl cool completely before brushing, avoid heavy products at the roots and use a flexible setting product suited to your hair. Stronger clips or pins can help preserve the side sweep during an event.
Are finger waves the same as Hollywood waves?
They are related vintage styles, but finger waves are typically sculpted close to the head using fingers, a comb and setting product. Hollywood waves often describe longer brushed-out, flowing ridges made from set curls.
Should I use a side part or center part?
A deep side part gives the most recognizable classic silhouette. A center part creates a softer, more modern version. Choose based on how you want the front wave to frame your face.
Can I get Hollywood waves without a curling iron?
A carefully set roller or pin-curl style can create the curl foundation for brushed-out waves. The exact result depends on your hair’s texture, length and how well the set dries and holds.
Final Thoughts
Old Hollywood waves are most convincing when the curls settle into one flowing pattern. Choose a part that suits your face, give the set time to cool and brush patiently. A single pearl pin or crystal clip can make the style feel ready for the holidays while keeping the waves themselves in focus.